

Media2URL
Audio processing studio

Fix the part of an audio file that actually needs work

There can be 10 seconds of silence in a voice recording before someone begins to speak. A podcast segment can last for a long time compared to what you would like to share, and a large .wav recording can be difficult to manage if the recipient is expecting a different audio format.

You may not need a complete audio production system for any of those positions. Media2URL Audio Studio provides you with editing options for existing audio files that are currently part of your workspace; this will allow you to cut up an audio file, create a new file type, use the existing volume control features, or select other output options prior to sending the finished product.

You can generate a hosted URL for a completed recording using the audio upload and link tool, and avoid having to open the processing workspace.

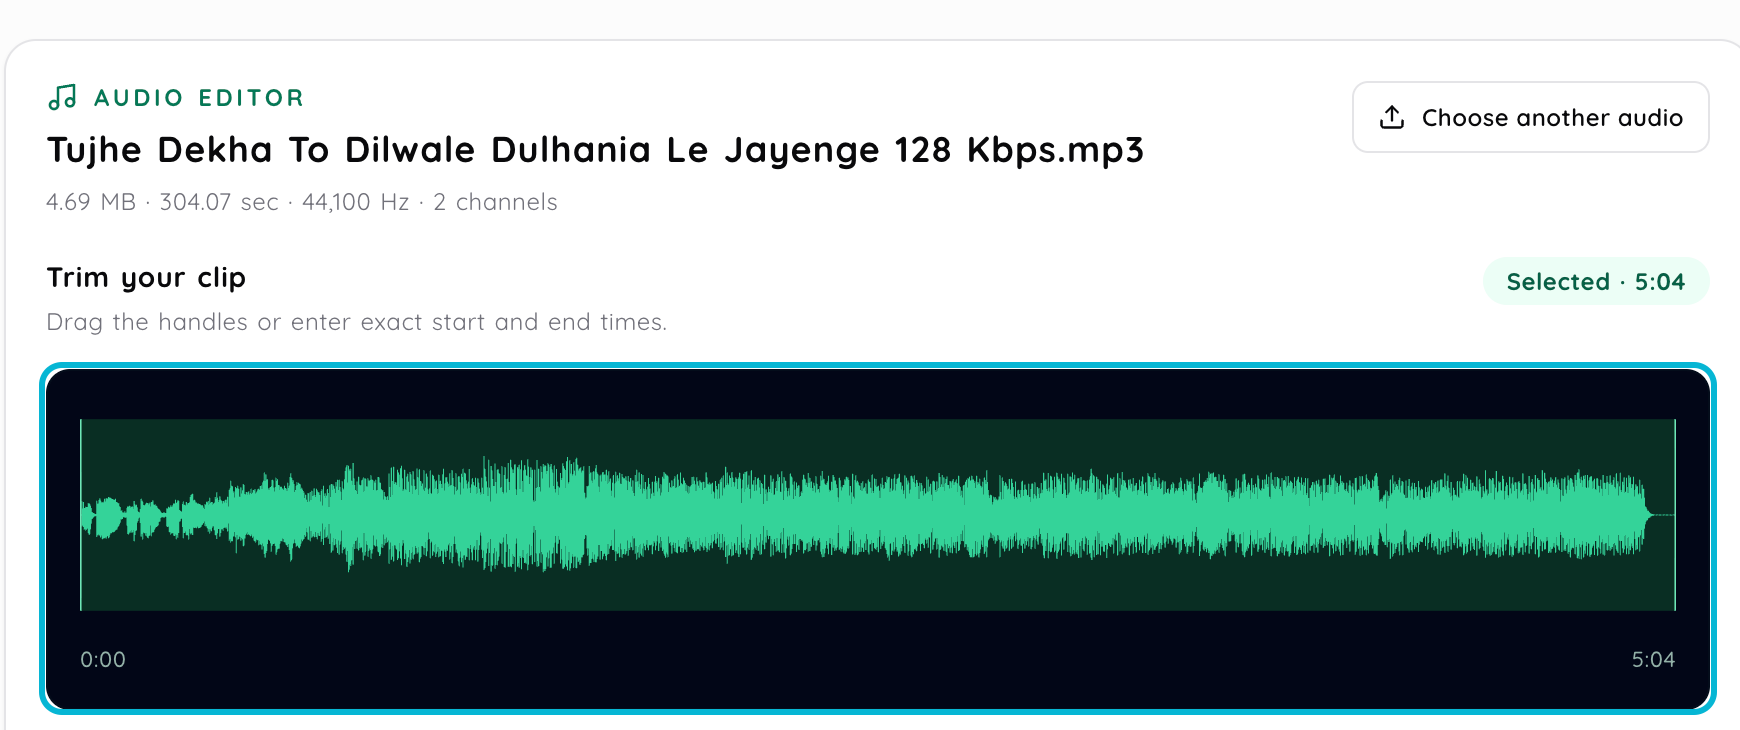
Audio Studio editor showing the selected MP3, clip duration, trim controls and highlighted waveform preview
Set trim points against the recording waveform before preparing a separate output.
The workflow

Start with the problem in the recording

It would be silly to modify five options in order to fix a single problem with a file. For example, if you have a voice memo that has some unwanted silence at the very beginning of the recording, then all that is needed is to trim off the unwanted portion. On the other hand, if your audio quality is good and you simply need to convert it to a different format for the device/program where you will be playing it back, then converting the file should be done instead.

The same concept applies to all of Audio Studio. Identify what you need to repair, and then use the tools that address that specific issue.

  1. Step 1

    Open the audio you want to work with

    Once you have chosen an existing track within your media library or another type of accepted audio file (e.g., voice note, podcast segment, sound effects, interviews etc.), you can start with it. There are several types of audio files that can be processed using the Audio Studio such as MP3, WAV, M4A, AAC, OGG and FLAC. However, the precise way your audio file will be processed depends upon the specific type of audio file selected and your account.

  2. Step 2

    Find the part you actually want to keep

    For an extended period of time, if there is a long recording, then the use of the waveform provides a visual means for locating the area that contains relevant information. Instead of having to listen to the entire recording each time in order to determine when someone begins to speak, use the trim points to set the boundaries for the portion of the recording that you wish to utilize. Trimming simply limits the amount of audio that remains after cutting out unwanted sections. It will not alter the format of the remaining audio nor will it adjust the volume level of the remaining audio.

  3. Step 3

    Change only the settings the file needs

    Once you have the section of the audio where you want to apply the settings, then you will be able to apply all of the other format, volume, and output controls that are available with the specific file. Since the converted copy is a copy, there is no need to make a volume adjustment just because the option exists. Likewise, a recording made in a very quiet environment does not require a different format unless you plan on submitting this recording to a venue that uses a different format.

  4. Step 4

    Save the processed result and continue from there

    After the processing of your file is complete, use the options given to you within the tool to save the resulting file. From there, you will be able to take advantage of the sharing and link options that are available for that saved asset. By doing so, you can keep the preparation of your audio files and the delivery of those files as part of the same workflow. It also prevents you from having to process the file in a different location, only to have to upload it again just so you can make a link.

Browser-local export

Choose the output that fits the recording

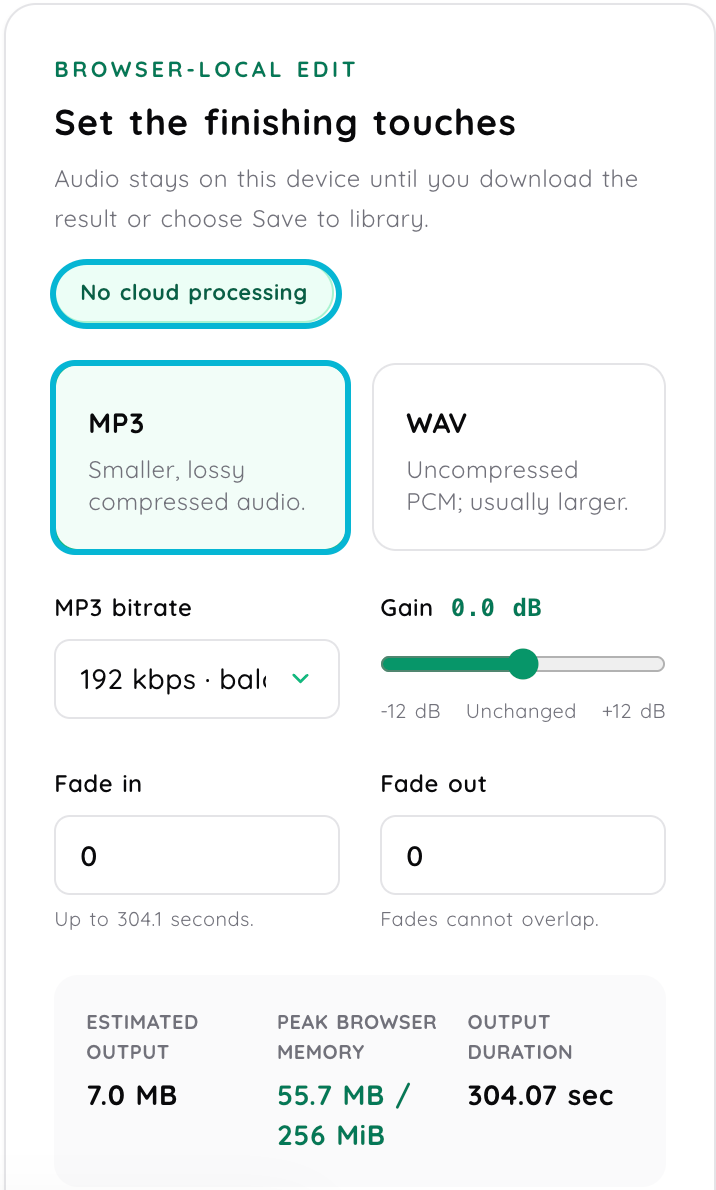
Select either MP3 or WAV, and only modify bit rate, volume (gain) or fade options if they are necessary for the edited portion of the file. You will see an estimation of the final file size, how much browser memory it may require and how long the resulting audio will last prior to making your edited version of the original.

Processing is done locally on your device. Once you save a final version of your project to your library, it will be uploaded as a separate file. Your original recording will remain unmodified.

Audio Studio browser-local export panel with MP3 selected, WAV available, bitrate, gain, fade and output estimate controls
Callouts identify the browser-local processing note and selected MP3 output; other settings are shown as captured.
Everyday audio work

Practical audio tasks that do not need a full editor

Trimming is often all a recording needs

Voice recording rarely starts and stops exactly when you want it to. A person hits "record," waits for some time, says what they need to say, and then stops recording.

Adding additional sections of audio is pointless when sending a file for someone else to evaluate. Trimming allows you to remove the unneeded portion of the audio while keeping everything else intact; this way you don't have to alter the entire recording just because you wanted to edit some small piece of it.

In much the same way as with a video, if you are looking to send someone a quick snippet from a podcast, rather than giving them the whole episode to find that 30-second portion, it would make sense to create a standalone audio file with just the parts they need.

Conversion is about where the file is going next

Sometimes, you may have a WAV recording that has great sound quality, but is not compatible with other software, websites or players. In these situations, it may be better to use a different audio format such as MP3 or AAC which are commonly supported by many applications.

This is because no single format is superior to all others. The best format for you will depend on how well it functions in its intended location and whether you are able to achieve a reasonable compromise between the size of your file and the audio quality you wish to maintain.

Check the format required by the site/app you plan to use before converting your audio. If you change formats without checking first, you will have just another format that won't work in the next stage.

A quiet recording and an uneven recording are different problems

In some cases, the whole recording is very quiet. For other recordings, the average level may seem uneven due to the fact that there is a part of the recording that is significantly louder than other parts.

Audio Studio provides controls for adjusting the volume and normalizing audio on supported files. These two operations should be seen as distinct and not just different names for the same task. Adjusting the level of a quiet file is very different than fixing inconsistent levels of loudness.

Before you consider your final product complete, you should hear how your processed audio sounds. Your settings may look good on paper, but if you don't listen to how it sounds to someone who is playing it, then your audio will likely need to be improved.

Bitrate is not a quality score

The numbers 128, 192, and 320 kbps can easily be viewed on a simple scale, with the largest number always being the most appropriate option. However, audio encoding is not nearly that straightforward.

Bitrate refers to the quantity of encoded data that has been transmitted during a given period. Higher bitrates can result in retaining more information based on the codec and source, whereas lower bitrates can lead to smaller file sizes.

A voice clip (or spoken audio) will have a different trade-off than a music recording. Speech can still be easily understood with low-quality settings, while the lack of detail in music will become more obvious if those same settings are used. Also, your end goal should be considered as part of making the right choice. Sending a quick preview of a voiceover to a client does not require the same level of quality as having a high-quality master copy of the recording so you can edit it later.

Sample rate describes something different

A sample rate describes the number of audio samples that are contained in every second. This is different than a bitrate, although both can have an impact on the final audio output and the amount of data needed to create it.

The use of a higher value is not necessarily the best option simply because it appears more "professional". When choosing from the available options for the source audio and how it will ultimately be used, consider what is most appropriate for each application rather than blindly selecting a higher value.

Audio formats

The extension does not tell the whole audio story

Because people use "audio file," "audio container," and "audio encoding method" as if they are synonymous terms when talking about audio, it can become very complicated. Although these three items relate to each other, they represent three distinct aspects of an audio file.

Codecs describe how audio is encoded

Audio codecs such as AAC, Opus and MP3 define how an audio signal is converted into digital data, and then how that digital data is converted back into an audio signal for listening.

Many codecs use lossy compression to discard some of the original data when compressing files. Two well-known examples of lossy compression include MP3 and AAC. On the other hand, FLAC uses a different method to provide lossless audio compression.

Containers hold audio and metadata

Formats (Ogg, WAV and M4A) function as containers/wrappers for audio streams, headers and metadata.

The key point to consider when deciding what level of technical detail you need to understand is how the file created will function on the device or program that will be used to play it (i.e., browser, website, player or app). You should not find yourself examining each technical layer prior to creating a track.

AAC and M4A are not simply the same thing

AAC is the name of a specific type of digital audio encoding format. M4A typically represents a digital container for holding multiple types of digital media such as audio, video, and/or still images. In many cases, AAC encoded digital audio will be contained within an M4A digital container.

The difference can be overlooked as most individuals call a sound file based on its file extension. However, this is beneficial when another system has specific requirements for the type of audio or file format that will work with that system.

Choosing the operation

Sometimes the simplest edit is the right one

Trim the recording

Use Trim when the useful audio is what it should be, but there is some extra unwanted introductory material, or some extra unwanted material at the end of the audio that can be removed.

Convert the format

Conversion will result in a file which has good sound quality however is not suitable for the next website, player, or application because of the format it is currently in.

Adjust the audio level

The volume controls can be used if you find that the recorded material is too quiet, or if you need to adjust the volume of the material prior to someone listening to it.

Change output settings with a reason

The use of bitrate and other similar settings should be considered only after considering whether the file size or where the file will be used has to be adjusted. If you change your settings simply because there are different options available, you may end up with a larger file and still have the same issue.

Asset governance

Do not throw away a useful original too early

While a small or modified version of a document may be perfect to share with others, it doesn’t necessarily mean that you should save a copy of this version as your primary working file.

Lossy Audio Is Especially Relevant In This Case. When you decode and re-encode a file in lossy format (like MP3 or AAC), you may degrade the quality of the file even more than was lost when it was originally compressed.

The choice to create a second, separate file for your Audio Studio workflow is often the best option if you plan to do further editing or conversion to the file. This allows you to manage both the original and the edited version using your Media Library, rather than having to start from the edited version each time you wish to make changes.

Real uses

Everyday workflows that benefit from quick audio processing

Cleaning a voiceover before client review

A voiceover take may have silence at the beginning, a "false start" or extra seconds at the end of the take. The reviewer shouldn't have to listen to all of these areas. Only trim off the area(s) you're going to provide feedback on, and then submit the trimmed version of the take for review.

Pulling a short preview from a podcast

A full-length podcast may include an area that is appropriate for a preview/reference clip. The other parts of the recording do not require modification. Indicate where the selected part begins and ends, make a shorter version based on those indications, and utilize that shorter version independently of the full-length podcast.

Preparing sounds for a website, game or application

A sound effect may be creatively correct; however, its format or the amount of data in its final output could be incorrect for the location in which it is to reside (i.e. web site, game engine, application). First, process the supported file and compare the results to the specific needs of the destination. It is the destination that determines which formats and output options are relevant, not the Audio Studio controls alone.

Making a long meeting easier to share

Recorded meetings/interviews often have some time at the very start where no useful discussion takes place. It would be rare for anyone to listen to this initial un-used part of the recording. Therefore, you can cut out that part of the recording to create a much more usable version of the recording to review, but at the same time maintain the full version of the recording so that you always have access to the complete original source material.

Before processing an important recording

Check the file before changing it

  • The current Audio Studio supports the following audio file formats: MP3, WAV, M4A, AAC, OGG and FLAC. Support for actual processing of these formats depends on the software used to process the files and the file itself.
  • The size of your file and how long you can record are determined by which type of account you have. Before you begin to process a very large amount of data, check what is available on the control panel for the audio that you have chosen.
  • Uploadable audio must meet the terms of Media2URL's Acceptable Use Policy and you should only upload content that you are authorized to utilize.
  • If the existing workflow provides a different way to store the file, retain the original if you plan to edit or convert the file again. By doing this, you will prevent having only one edited version of the file as your initial source.
Questions about Audio Studio

Frequently asked questions

For every website and/or device, there is no single best format. For general distribution, MP3 continues to be the most popular format, but AAC, Vorbis and other formats are suitable for specific playback situations. Prior to converting your recorded material, determine which format the target environment will support. Your most suitable format is the one that allows the content to play correctly within the target environment, provides an acceptable file size and delivers a satisfactory listening experience.

Yes, for all supported audio that is accessible within the Audio Studio Workflow. You can open a track and then use the waveform to select which portion of the audio you would like to retain. However, the options and limitations of the processing will continue to be dependent upon the specific file you choose to process, your user account permissions, and your workspaces permissions.

Audio normalization adjusts an audio signal's volume level based upon the processing capabilities used on that particular track. It is important to note that normalization is not merely adjusting the volume of a track up (or down). When using any form of audio processing, always verify your results by listening to them prior to replacing a valuable source recording, particularly if there is a chance you may need to use that same source recording again.

Media2URL will allow users to upload and host their supported audio. The rules for uploading files depend on the type of file being uploaded, the size of the file being uploaded and what the user has subscribed to with Media2URL. If users are looking to create a short podcast excerpt or some other supported output from their audio prior to sharing it, Audio Studio may assist in this process. Files hosted on Media2URL and processed through Audio Studio are two different steps of the overall workflow.

Trimming determines what parts of the recorded material will appear in the final product. Converting a format defines how the recording is organized or formatted so it can be used with a different type of hardware/software. It is possible to trim the recording without changing the format. Conversely, you may convert the format of the recording without cutting out any of the recorded material.

No. The AAC (Advanced Audio Coding) format is a method of compressing and encoding sound. The M4A format is a way of packaging files containing audio. It's common to find files that have been compressed and encoded using the AAC format packaged into a single file with the M4A extension. Because of this, many people get confused about the differences between AAC and M4A.

No. While a higher bitrate can provide better results when encoding in some circumstances, what is the best setting depends on your codec, your source material and how you plan to play back the audio. Your voice and music are going to compress differently as well. If you select the largest possible number, you may get a larger file size without providing any real benefit to the listener.

The number of audio samples per second represents the sample rate. The sample rate differs from the bit rate. An increase in sample rate will typically result in an increase in the size of the audio file; however, the correct setting for your sample rate depends upon the original source and the use of the final product.

Next steps

Continue the audio workflow

For finding and managing the source and processed files later.

When the source is actually a video and the job involves extracting or processing its media.